
The Transactions tab
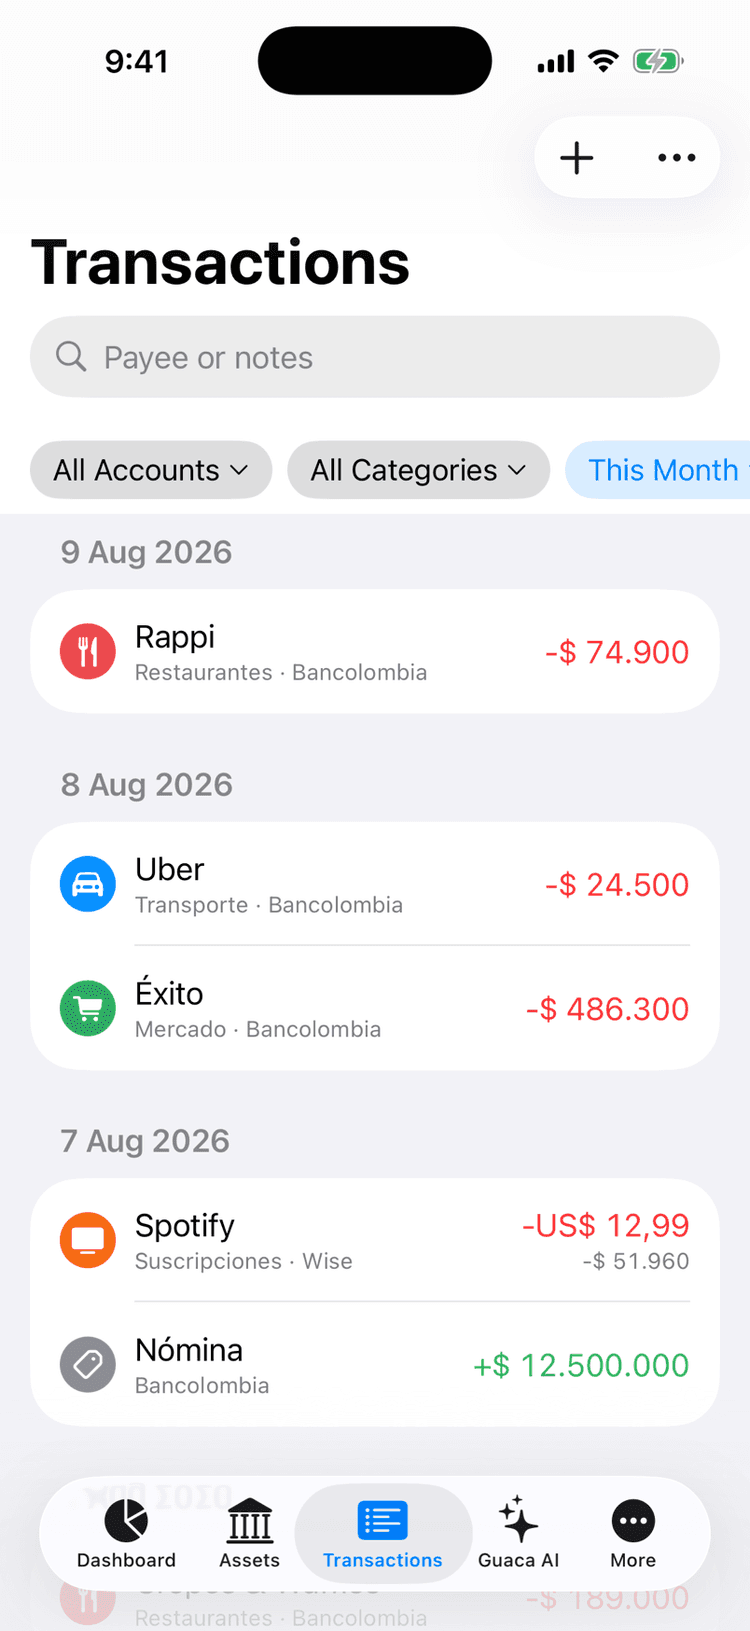
Tap Transactions in the bottom tab bar to open your ledger (on iPhone the screen is titled All Transactions). Rows are grouped by day and load as you scroll; on Android each day header also shows that day's total in your display currency.
- The icon shows the category, or a swap icon for transfers; splits show the dominant category with a +N badge.
- The title is the payee, falling back to Transfer, Investment, the category or the type.
- The subtitle reads category · account · place; transfers read From → To. Tags appear as chips.
- The amount is in the transaction's own currency, green for income and red for expenses (transfers are neutral); a small caption shows the converted amount when it differs from your display currency.
The search box (Payee, notes, or amount) filters as you type. Below it, filter chips open sheets with Reset and Apply. There is no separate income/expense filter — use categories instead.
- Date
- Presets All Time, This Month (default), Last Month, This Year, Last 7/30/90 Days and Last 12 Months, or Use Custom Range with a start and end date.
- Accounts
- Pick one or more accounts; archived accounts are listed under ARCHIVED.
- Categories
- Checking a parent selects all its subcategories. Special entries cover Uncategorized, Transfers and Balance adjustments.
- Tags
- Only shown once you have created at least one tag.
The toolbar has two icons: Recurring opens your recurring rules, and the To Confirm tray shows a badge counting pending recurring instances and capture suggestions. Importing files lives in the drawer under Import, not here.
Adding a transaction
Tap the center + in the tab bar to start a new transaction; long-press it for the quick-add sheet (on the Net Worth tab a tap opens the sheet). If you have no accounts yet, Guaca takes you to the new-account form first.
The form opens keypad-first: you see only the type cards and a big amount over a calculator keypad, with no system keyboard. The account defaults to the one you used last, or to the account whose detail page you were viewing.
- 1Type the amount on the keypad, then dismiss it to reveal the full form.
- 2Choose a type card: Expense, Income, Transfer or Investment.
- 3Pick the Account (required) and a Category.
- 4Under Details, set the Date, a Payee (history suggestions also apply the last category you used with them) and Notes.
- 5Tap Save. On Android, Save is always enabled and invalid fields shake; on iPhone it stays disabled until the form is valid.
- Currency
- Tap the currency code next to the amount to pick another. Choosing an account resets the currency to that account's.
- Split in categories
- Adds category slices with a live Remaining counter; Add Transfer adds a transfer slice and Remove split returns to a single category.
- Tags
- Opens a multi-select picker for your tags.
- Location
- Add Current Location attaches a map preview; Remove location clears it. Turn on auto-geotag in Settings to do this automatically.
- Attachments
- Take Photo, Add Photo or Upload Photo to attach receipts; tap a thumbnail to view, share or delete it.
- Savings goal
- Expenses only. Turn on Pay with goal money and set the Amount paid from goal to spend money you had set aside.
- Income Stream
- Income only. Logs the entry as a payment of one of your income streams; Always assign this payee remembers the link.
- Repeats
- Turns the entry into a recurring rule. See the recurring and planned transactions topic below.
Transfers between accounts
Choose the Transfer card to move money between two of your accounts. The header shows the amount leaving the origin Account pill, a Swap accounts button and a Destination pill; tap either pill to change the account.
When the two accounts use different currencies, the destination shows a converted default. Tap it to enter the exact Amount Received so both balances match your statements.
In the list a transfer has a neutral swap icon, an unsigned grey amount and the subtitle Origin → Destination. To see only transfers, open the Categories filter and check Transfers.
Transfers need at least two accounts. With a single account the form says Transfers need a second account and offers Add Account; see Accounts.
Linking to investments and debts
The Investment type card links a transaction to something you track elsewhere in Guaca: buy or sell for holdings and assets, pay or collect for debts and credit cards. Under the cards, Guaca asks Are you paying a debt or building your wealth? for expenses, or Are you collecting a debt or selling part of your wealth? for income.
- Buying a holding logs the ledger transaction and adds a lot to that holding.
- Contributing to an asset logs the transaction and records an asset contribution.
- Paying a debt logs the transaction and records a payment against that liability.
Once linked, the Apply to row becomes read-only and its footer explains the link, for example Logged as a debt payment… New links are always created through the Investment card.
Editing and deleting
Tap any row in the Transactions tab to open it in the edit form. Change what you need and tap Save; a pending row shows Confirm instead.
- 1Touch and hold a row for the context menu: Edit, Log as Income Payment, Create Category Rule (Pro) or Delete.
- 2Or swipe the row left and tap Delete.
Deleting asks Delete transaction? — “The account balance will be adjusted. This cannot be undone.” The edit form also ends with a Delete Transaction button.
- Every save reverses the old balance effect and applies the new one.
- Deleting reverses the balance effect, removes any linked debt payment, asset contribution or holding lot, and restores savings-goal funding.
- Pending (unconfirmed) rows have no balance effect until you confirm them.
Recurring and planned transactions
In the drawer, under Money Management, tap Recurring (Android) or Planned & Recurring (iPhone). The Recurring icon in the Transactions toolbar opens the same screen.
- Turn on Repeats while adding a new transaction, or tap Add Rule → Recurring Transaction on the Recurring screen.
- On iPhone the rule reuses the transaction form in rule mode, with an Active toggle.
- Turning Repeats on moves a past start date to today.
- Repeat
- Daily, Weekdays, Weekends, Weekly, Biweekly, Monthly, Every 3 Months, Every 6 Months, Yearly or Custom.
- Custom
- A frequency (daily, weekly, monthly or yearly) plus an interval from 1 to 365.
- End Repeat
- Android: switch on End Repeat On a Date and pick an End Date. iPhone: choose Never or On Date.
- Add automatically
- Confirms each occurrence and posts it to the balance on its due date. Off, occurrences appear as drafts you confirm before they affect any balance.
- Notify
- Reminds you when an occurrence is due (on by default).
Drafts wait in the To Confirm tray under Pending Confirmation (N) with their due date. Confirm posts the balance once and advances the rule; Skip discards the draft and advances. Tap the row to adjust anything first; on iPhone the menu also offers Edit & Confirm and Skip This One.
The Recurring screen lists rules with their Next date and a Per Month summary of Bills, Income and Net. Detected Subscriptions suggests rules from repeated payments — tap one to create it or Dismiss it. A rule can link an Income Stream or a Liability so each occurrence logs the payment (see Budgets & income and Debts).
Categories and tags
In the drawer, under Organization, tap Categories to see your category tree. Search with Filter by name, tap Add Category, or on an empty list tap Add starter categories.
- 1Touch and hold a category for Edit, Add Subcategory, Archive (or Restore) and View Transactions.
- 2Swipe left on a category to Delete it.
- Name, Icon, color
- How the category appears on rows and in charts.
- Parent Category
- Nest it under another category.
- Budget
- Optional Weekly, Monthly or Yearly limit with amount and currency, plus Carry Over Unused Budget and Alert When Spending Passes. See Budgets & income.
- Counts Toward Retirement
- Includes this spending in the retirement planner. See Time Travel.
- Archived
- Archived categories move to ARCHIVED, sort last and are not offered in forms. Archiving a parent archives its children.
Tags (also under Organization) are labels that cut across categories, shown as chips on rows. The list shows usage counts; tap Add Tag to create one with a name and color, or open a tag for Edit and View Transactions. Deleting a tag removes it from its transactions; the transactions are kept.
Category rules (Pro)
Rules assign a category when a transaction's payee matches a phrase. Open the drawer → Automate → Category Rules, or long-press / touch and hold a transaction with a payee and choose Create Category Rule to start a rule prefilled with that payee (not available for transfers).
- Pattern
- Text or a regular expression. Case- and accent-insensitive, matched against payee and notes.
- Amount
- Any amount, Less than or Greater than a value, in the transaction's own currency.
- Category
- The category to assign on a match.
- Rules run top to bottom and the first match wins — reorder with the drag handle (Android) or in Edit mode (iPhone).
- Rules only fill rows that arrive without a category, such as synced, imported or captured transactions.
- A category you set yourself is never overridden.
To catch up on existing rows, tap Apply Rules to N Uncategorized, review the preview and confirm. See Import & capture for how rows arrive.